嵌入式系统实验课大概涉及的内容有以下几个部分:
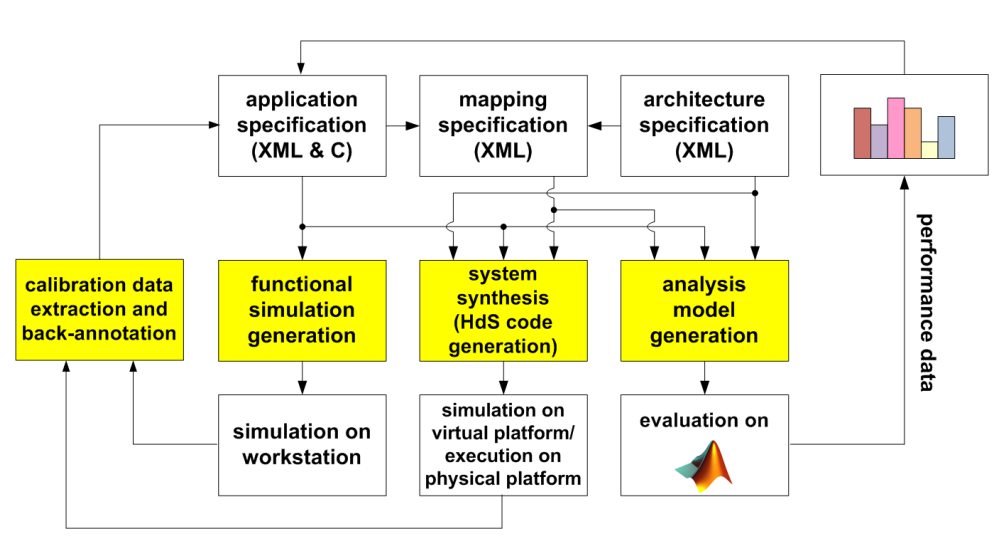
主体就涵盖了三条纵线一条横线,functional simulation,Hds simulation,analysis model 是三纵,如何通过三纵得到的数据迭代获取 application 和 architecture 的最佳 mapping 为一横。
DOL Framework的了解,入门编程,功能仿真
1.1 DOL + systemC
Functional Simulation,包括分析,动手编程修改 example 模型
1.2 MPARM + RTEMS OS
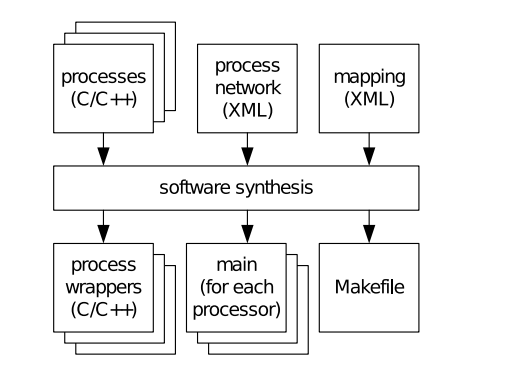
System Synthesis (Hds(Hardware dependent software),硬件相关软件层),mparm
1.3 MATLAB + RTC/MPA
Analysis Model 分析,MPA(Modular Performance Analysis),获取当前 mapping 的各项参数,如: Backlog, Delay,用于迭代的 back-annotation。解决 Application 到 Architecture 的 Mapping: DES(Design Space Exploration) 探索,使用 EXPO 并进行数据分析。

- DeadLock 死锁问题
- KPN 模型设计与分析
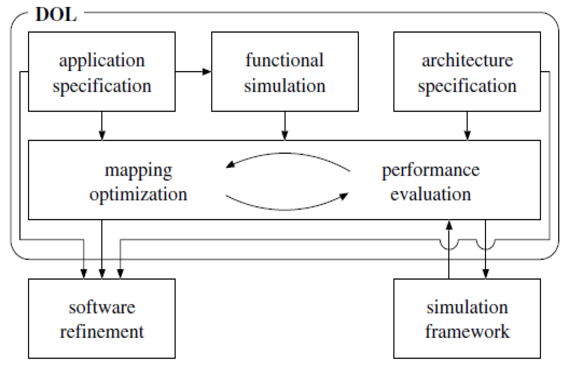
D(istributed)O(peration)L(ayer)
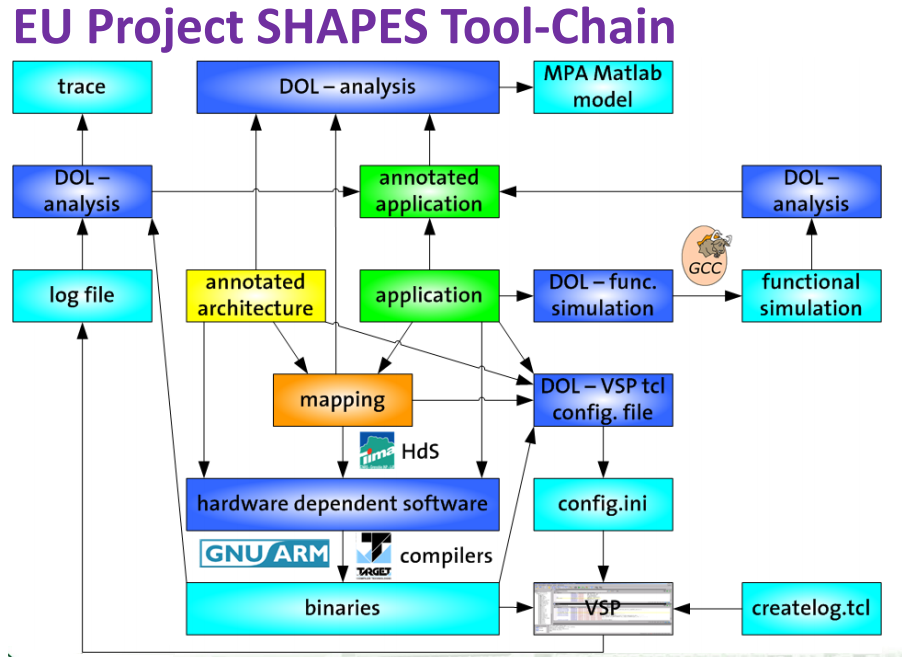
- 上图描述了 DOL 的整体框架以及所使用的工具链
VSP: Virtual SHAPES Platform
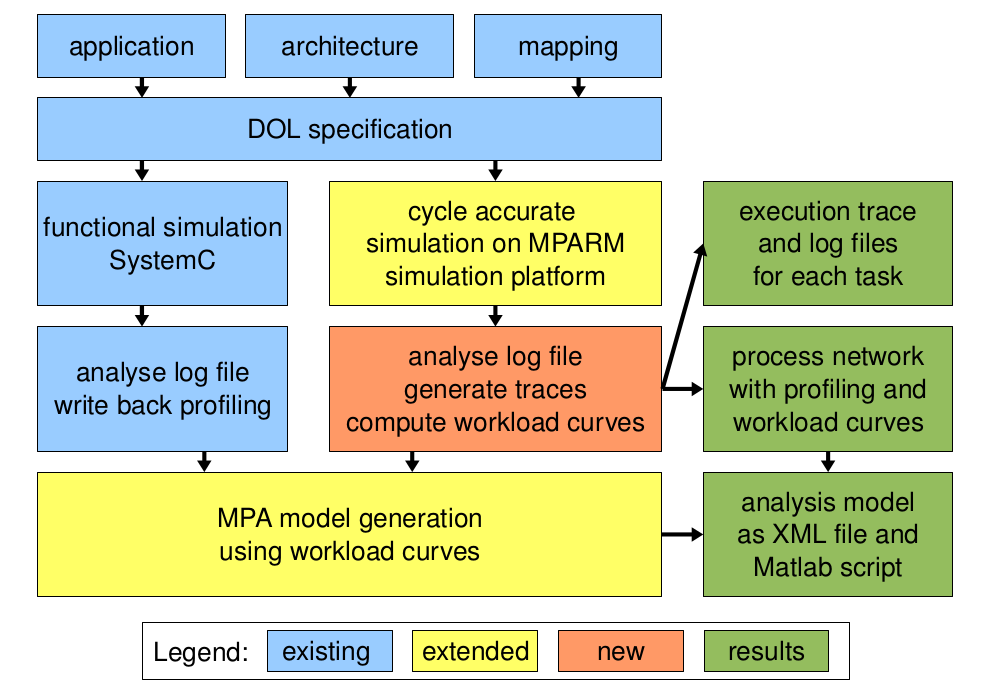
- 上图描述了 DOL 的整体流程:
1). DOL Specification,包括
*.c,*.h,*.xml定义的 application,*.xml定义的 architecture 和 mapping
2). 自动化生成 SystemC 代码,并基于 SystemC 进行 Functional Simulation
3). 自动化生成 MPARM 平台上运行的二进制代码,进行 Cycle Accurate Simulation
4). 利用上述两种 Simulation 产生的 Log files 生成 MPA Model,进行 RTC 等相关分析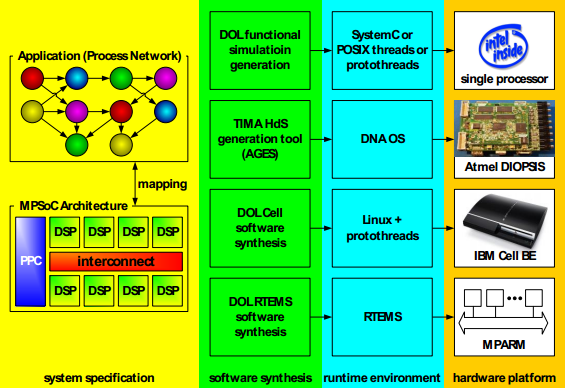
- 接下来会介绍两种 DOL Software Synthesis:
- 基于 SystemC 的功能仿真
- 基于 RTEMS(real-time executive for multiprocessor systems) 和 MPARM 的模拟仿真(Cycle Accurate Simulation)
DOL & SystemC for Functional Simulation(内部过程)
+ processing an XML process network description and the associated C source code to generate an executable SystemC model
+ dotty is used for visualizing process networks
- Step 1: Flattening of the process network description
Java class XMLFlattener, XMLFlattener creates a Java class that can generate the flattened XML file
-
1
2
3
java dol.helper.flattener.XMLFlattener pn.xml Generator
javac Generator.java
java Generator > flattened_pn.xml
- Step 2: Flattening of the generated XML file
2.1 Flattened XML file — dotty —> representation of the process network
To generate a network description displayable by dotty, use dol with the -D flag.
To specify the process network file, use the -P flag.
The -c flag is used to enable a basic consistency check of the process network,dol will check whether each port is connected to some channel, for instance -
1
2
java dol.main.Main -P flattened_pn.xml -D dotty_pn.dot -c
dotty dotty_pn.dot
2.2 Flattened XML file + C source code — dol —> executable SystemC application
To generate the source code for an executable systemC application, use dol with the -H flag
dol will create a directory with the specified name containing all required source files for generating a systemC application, including a Makefile
2
3
4
5
6
cp $(AllSourceFiles) ./src
java dol.main.Main -P flattened_pn.xml -H systemc -c
cd systemc/src
make
./sc_application
runexample.xmlwill trigger the flattening, C code generation, compilation, and execution of the specified example.-
1
2~/dol_ethz> cd build/bin/main
~/dol_ethz/build/bin/main> ant -f runexample.xml -Dnumber=1
Assignment
- How to configure DOL environment in your computer?(Week 2, ES2017)
- Check your system environment
-
1
2
3
4
5
6xxx@...:~$ sudo lsb_release -a
No LSB modules are available.
Distributor ID: Ubuntu
Description: Ubuntu 16.04.3 LTS
Release: 16.04
Codename: xenial- The requirements:
- C/C++ environment: compiler, linker
- Java environment: javac, java
- Build environment: make, Ant (version 1.6.5 or greater)
- The requirements:
-
1
2
3
4
5
6
7
8
9
10
11
12
13
14
15
16
17# check your gcc
xxx@...:~$ gcc -v
Using built-in specs.
COLLECT_GCC=gcc
COLLECT_LTO_WRAPPER=/usr/lib/gcc/x86_64-linux-gnu/5/lto-wrapper
Target: x86_64-linux-gnu
Configured with: ../src/configure -v --with-pkgversion='Ubuntu 5.4.0-6ubuntu1~16.04.4' --with-bugurl=file:///usr/share/doc/gcc-5/README.Bugs --enable-languages=c,ada,c++,java,go,d,fortran,objc,obj-c++ --prefix=/usr --program-suffix=-5 --enable-shared --enable-linker-build-id --libexecdir=/usr/lib --without-included-gettext --enable-threads=posix --libdir=/usr/lib --enable-nls --with-sysroot=/ --enable-clocale=gnu --enable-libstdcxx-debug --enable-libstdcxx-time=yes --with-default-libstdcxx-abi=new --enable-gnu-unique-object --disable-vtable-verify --enable-libmpx --enable-plugin --with-system-zlib --disable-browser-plugin --enable-java-awt=gtk --enable-gtk-cairo --with-java-home=/usr/lib/jvm/java-1.5.0-gcj-5-amd64/jre --enable-java-home --with-jvm-root-dir=/usr/lib/jvm/java-1.5.0-gcj-5-amd64 --with-jvm-jar-dir=/usr/lib/jvm-exports/java-1.5.0-gcj-5-amd64 --with-arch-directory=amd64 --with-ecj-jar=/usr/share/java/eclipse-ecj.jar --enable-objc-gc --enable-multiarch --disable-werror --with-arch-32=i686 --with-abi=m64 --with-multilib-list=m32,m64,mx32 --enable-multilib --with-tune=generic --enable-checking=release --build=x86_64-linux-gnu --host=x86_64-linux-gnu --target=x86_64-linux-gnu
Thread model: posix
gcc version 5.4.0 20160609 (Ubuntu 5.4.0-6ubuntu1~16.04.4)
xxx@...:~$ sudo apt-get install ant
# install Java environment
xxx@...:~$ sudo apt-cache search openjdk-*
xxx@...:~$ sudo apt-get install openjdk-<your cache jdk version>-jdk
# check installation success or not
xxx@...:~$ java -version- 配置 DOL 依赖: SystemC
-
1
2
3
4
5
6
7
8
9
10
11
12
13
14
15
16
17
18
19
20
21
22
23
24
25
26
27
28
29
30
31# SystemC environment (version 2.1 or greater)
# File: systemc-2.3.1.tar
# 链接:http://www.accellera.org/downloads/standards/systemc/files
xxx@...:~$ tar -zxvf systemc-2.3.1.tgz
xxx@...:~$ rm systemc-2.3.1.tgz
# 1. Change to the top level directory (systemc-2.3.1)
xxx@...:~$ cd systemc-2.3.1
xxx@...:~$ pwd
# 2. Create a temporary directory(automake's out-of-source build), e.g.,
xxx@...:~$ mkdir build
# 3. Change to the temporary directory, e.g.,
xxx@...:~$ cd build
# 4. Configure the package for your system, e.g.,
xxx@...:~$ ../configure CXX=g++ --disable-async-updates
# 5. Compile the package.
xxx@...:~$ make
# 6. [option] verify the compiled package by testing the example suite.
xxx@...:~$ make check
# 7. Install the package.
xxx@...:~$ make install
# 8. You can now remove the temporary directory, .e.g,
xxx@...:~$ cd ..
xxx@...:~$ rm -rf build
# Alternatively, you can keep the temporary directory to allow you to:
# a) Experiment with the examples.
# b) Later uninstall the package.
# To clean up the temporary directory, enter:
xxx@...:~$ make clean
# To uninstall the package, enter:
xxx@...:~$ make uninstall- 配置 DOL
-
1
2
3
4
5
6
7
8
9
10
11
12
13
14
15
16
17
# wget http://www.tik.ee.ethz.ch/~shapes/downloads/dol_ethz.zip
xxx@...:~$ cd ~/Workspace/DOL
xxx@...:~$ unzip dol_ethz.zip
xxx@...:~$ rm dol_ethz.zip
# 修改 build_zip.xml 文件
xxx@...:~$ vim build_zip.xml
# 找到下面这段话,修改成上面编译的 SystemC 所在的位置,
# <property name="systemc.inc" value="YYY/include"/>
# <property name="systemc.lib" value="YYY/lib-linux/libsystemc.a"/>
# 把YYY改成上面pwd的结果(注意,对于64位系统的机器,lib-linux要改成lib-linux64)
# 编译 DOL,若成功会显示 BUILD SUCCESSFUL
xxx@...:~$ ant -f build_zip.xml all
# 接着可以试试运行第一个例子
# 进入build/bin/mian路径下
xxx@...:~$ cd build/bin/main
# 然后构建,运行第一个例子
xxx@...:~$ ant -f runexample.xml -Dnumber=1
- Q&A
- build_zip.xml 无法保存
-
1
Ans:sudo gedit build_zip.xml
- 最后一步 build failed
-
1
2
3
4
5
6
7
8
9
10
11
12
13
14
15
16
17
18
19
20
21出现在中文系统,在dol/build/bin/main下的runexample.xml 215-217行需要注释或者删掉
Ans: 找到
<tstamp>
<format property="touch.time"
pattern="MM/dd/yyyy hh:mm aa"
offset="-5" unit="second"/>
</tstamp>
<touch datetime="${touch.time}">
<fileset dir="example${number}"/>
</touch>
修改为:
<!--
<tstamp>
<format property="touch.time"
pattern="MM/dd/yyyy hh:mm aa"
offset="-5" unit="second"/>
</tstamp>
<touch datetime="${touch.time}">
<fileset dir="example${number}"/>
</touch>
-->- make 和 ant 有什么不一样
-
1
Ans: MAKE是基于C语言;ant是基于Java语言
- 第一次 build successful, 但是最后 build failed
-
1
2Ans: 这个问题大致上是JAVA的问题
对于这个问题,安装JDK可以解决,sudo apt-get install openjdk-?-jdk可以解决- sudo apt-get install openjdk-?-jdk 后,build 还是有问题
-
1
Ans: 可能因为安装了多个版本的JAVA,需要设置一下JAVA的环境变量
- 有人遇到
pthread_mutex_tryloc,什么鬼的
- 有人遇到
-
1
2
3
4Ans: 表示摊手,因为在编译 SystemC 时,
sudo ../configure CXX=g++ --disable-async-updates,
这是systemc的相关设置,已经禁用了pthread。
如果按照上述语句configure还出现问题的,试试重新安装一遍。- PPT 上最后一个图示可以画出来的吗?
-
1
Ans:可以,在build/bin/main 的exmaple文件里有面个*.dot文件,双击就可以看到了
- dol 源码目录解读
bin/
dol jar包
dol.jar archive and compile scripts for the DOL functional simulation
第三方 jar包
Third-party Java libraries used by DOLexamples/
examples/example?/
Example applications (source code and process network XML(example?.xml) mapping XML(map_?.xml))
examples/arch/
examples/mapping/
Example architecture and mapping XML filesschema
Semantics of the DOL XML Schematadocs/
Documentation of DOL API, DOL functional simulation, XML schema semantics, and examples
- dol 源码目录解读
- Analyze DOL framework by some example.(Week 3, ES2017)
- Write your DOL Apps based on above analysis.(Week 3, ES2017)
MPARM Simulation with RTEMS OS
+ mapped onto the virtual shapes platform (VSP) 虚拟 SHAPES 平台
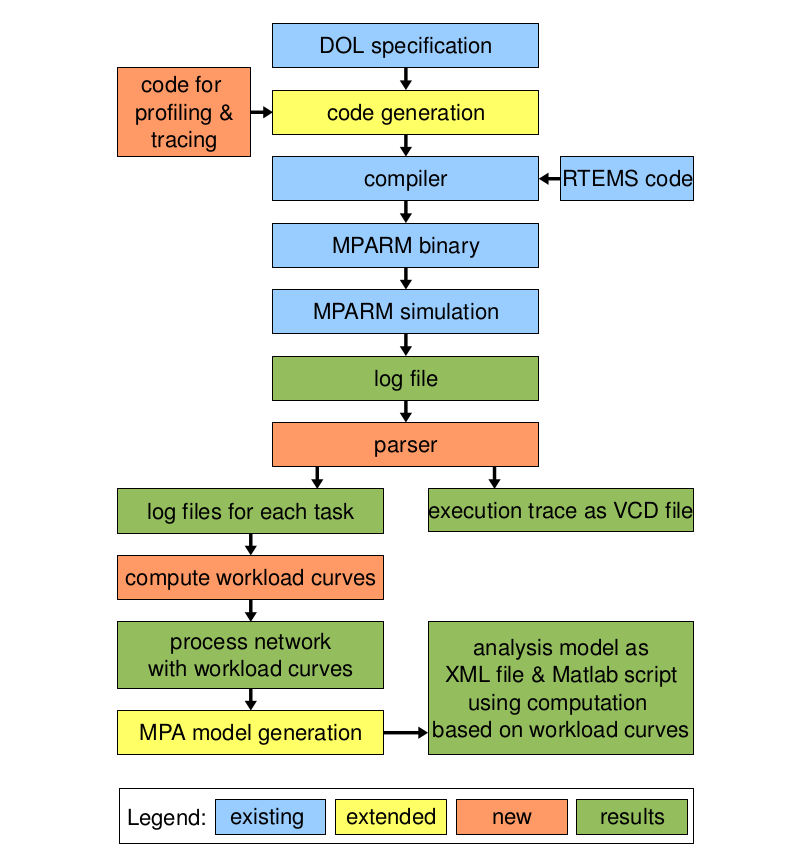
MPARM is proposed based on SystemC register transfer level (RTL) and SWARM (software Advanced RISC Machine (ARM)) simulator (the open source cycle accurate SWARM (software ARM) simulator encapsulated in a SystemC wrapper).
Assignment
- Configure and run MPARM simulation.(Week 4, ES2017)
- Step1: Install requirement: MATLAB
-
1
2
3
4
5
6
7
8
9
10
11
12
13
14
15
16
17
18
19
20
21
22
23
24
25
26
27
28
29
30
31
32
33
34
35
36
37
38
39
40
41
42
43
44
45
46
47
48
49
50
51
52
53
54
55# 安装MATLAB_R2014A
# 1. 步入ISO所在路径,sudo mount MATHWORKS_R2014A.iso MATLAB_R2014A/ 挂载MATHWORKS_R2014A.iso到MATLAB_R2014A
x@.:~$ mkdir MATLAB_R2014A
x@.:~$ sudo mount MATHWORKS_R2014A.iso MATLAB_R2014A/
# 2. 启动安装
x@.:~$ cd MATLAB_R2014A/
x@.:~$ sudo ./install
# 3. 选择是否在线安装时,选否,即 install manually without using the internet
# 让输入key,输入 12313-94680-65562-90832
# 文件安装路径选择依照自己习惯,一般为:/usr/local/
x@.:~$ sudo umount -v MATLAB_R2014A/
x@.:~$ sudo rm -rf MATLAB_R2014A/
# 4. 步入 /usr/local/MATLAB/R2014a/bin, sudo ./matlab,即可启动 MATLAB,说明成功安装并破解
x@.:~$ cd /usr/local/MATLAB/R2014a/bin
x@.:~$ sudo ./matlab
# 5. 不使用Internet手动激活,使用:破解/Crack/license_405329_R2014a.lic文件
# 此外,将 破解/Crack/Linux/libmwservices.so 复制到 MATLAB/R2014a/bin/glnxa64/ (可能需要通过命令mv或者cp)
x@.:~$ cd <ISO所在路径>
x@.:~$ unzip MATHWORKS_R2014A_Crack.zip
x@.:~$ sudo cp Crack/Linux/libmwservices.so /usr/local/MATLAB/R2014a/bin/glnxa64/
x@.:~$ cd /usr/local/MATLAB/R2014a/bin
# MATLAB已经破解,正常启动
x@.:~$ sudo ./matlab
# 6. 制作 MATLAB 快捷启动 (matlab-support)
# sudo apt-get install matlab-support 按照要求填写目录即可
# 任意 Terminal下 键入命令:matlab 即可启动,如果报错,需要键入 sudo matlab
x@.:~$ sudo apt-get install matlab-support
# Location of MATLAB installation(s): /usr/local/MATLAB/R2014a
# Authorized user for MATLAB: <empty>
# ...
# 7. [option]更改 MATLAB 默认文件夹
# 在 MATLAB 命令行键入 edit pathdef,在 pathdef.m 文件最末尾添加: cd 你要设置的默认目录 即可。
# 8. 配置RTC ToolBox 说明
# 链接: http://www.mpa.ethz.ch/Rtctoolbox/Download
# rtc_toobox.zip is the same contents as tecsexperiments-2010-10-22-final/testbed/matlab/rtc
# Extract the downloaded zip package. The extracted directory will contain a directory called rtc.
# Copy or move the directory rtc to its final installation destination, e.g. to $MATLAB$/toolbox/rtc
x@.:~$ sudo unzip rtc_toobox.zip -d /usr/local/MATLAB/R2014a/toolbox/
x@.:~$ sudo matlab
# Open Matlab and change to the rtc directory:
cd $MATLAB$/toolbox/rtc
# Run:
rtc_install
# Now you can start using the RTC Toolbox. To explore the functionality of the RTC Toolbox, try the following:
help rtc
# Uninstalling the Real-Time Calculus (RTC) Toolbox:
rtc_uninstall
# You may now delete the directory $MATLAB$/toolbox/rtc
x@.:~$ sudo rm -rf /usr/local/MATLAB/R2014a/toolbox/rtc- Step2: Configure testbed environment
-
1
2
3
4
5
6
7
8
9
10
11
12
13
14
15
16
17
18
19
20
21
22
23
24
25
26
27x@.:~$ unzip tecsexperiments-2010-10-22-final.zip
# 1. 修改 mparm/RTEMS-os/install-rtems/arm-rtems/arm_bare_bsp/Makefile.inc
# 'prefix'和'exec_prefix'所对应的路径修改为自己的 mparm 所在目录
prefix = /home/khuang/work/mparm-haid/mparm/RTEMS-os/install-rtems
exec_prefix = /home/khuang/work/mparm-haid/mparm/RTEMS-os/install-rtems/arm-rtems
# 2. 修改 testbed/localjars/dol.properties 中'SYSTEMC_INC'和'SYSTEMC_LIB'所对应的路径
# 修改为自己 systemC 中 include 与 libsystemc.a 所对应的目录
SYSTEMC_INC = /home/khuang/work/shapes/systemC/include
SYSTEMC_LIB = /home/khuang/work/shapes/systemC/lib-linux/libsystemc.a
# 3. 在 testbed/localjars 中更新 dol.jar 参数, 使用命令 jar -uf dol.jar dol.properties
x@.:~$ jar -uf dol.jar dol.properties
# 4. 修改 testbed/build.xml 中'mparm.dir'所对应的路径为自己 mparm 所在路径
<property name="mparm.dir" location="/home/khuang/work/mparm-haid/mparm/"/>
# 5. 至此, 就可以运行 testbed 了, 在 testbed 目录下执行 ant, 查看结果
x@.:~$ cd ~/Workspace/tecsexperiments-2010-10-22-final/testbed
x@.:~$ ant
# 6. 调用 MATLAB 分析 MPA
x@.:~$ cd tecs
x@.:~$ ./runmatlab.sh
# 7. [option]修改 testbed/build.xml 中'source.dir', 可以运行不同的测试样例, 测试样例在 tecs/examples 目录下。
<property name="source.dir" value="tecs/examples/examplemjpegVSP-trigger"/>- Q&A
-
1
2
3
4
5
6
7
8
9
10
11
12
13
14
15
16
17
18# MPARM工具是32位程序,通过查看链接情况解决依赖位数不匹配的问题
# 需要安装i386的C++标准库
# 参考链接: http://askubuntu.com/questions/709893/14-04-01-32-bit-missing-g-64-bit-include-files-when-cross-compiling
x@.:~/Workspace/tecsexperiments-2010-10-22-final/mparm/swarm/bin$ ldd mpsim.x
linux-gate.so.1 => (0xf7747000)
libstdc++.so.5 => not found
libm.so.6 => /lib/i386-linux-gnu/libm.so.6 (0xf76e8000)
libgcc_s.so.1 => /lib/i386-linux-gnu/libgcc_s.so.1 (0xf76ca000)
libc.so.6 => /lib/i386-linux-gnu/libc.so.6 (0xf751c000)
/lib/ld-linux.so.2 (0xf774a000)
# This is just a dependency package that resolves to g++-?-multilib for the default gcc/g++ version,
# and in turn depends on lib64stdc++-?-dev (64-bit compilation on 32-bit) or libx32stdc++-?-dev (32-bit compilation on 64-bit)
# it is these that contain the actual header files.
x@.:~/Workspace/tecsexperiments-2010-10-22-final/mparm/swarm/bin$ sudo apt-get install g++-multilib
# 可能因为版本过久,通过 apt-get 的方式还是没办法安装指定的 libstdc++.so.5,就需要通过以下手动方式安装
# 下载deb: https://packages.debian.org/stretch/libstdc%2B%2B5(选择 i386)
# deb install
x@.:~$ sudo dpkg -i libstdc++5_3.3.6-28_i386.deb -
1
2
3[exec] <builtin>: recipe for target 'que_lib/lib/ss_semaphore_lib/ss_semaphore.o' failed
[exec] arm-rtems-g++: installation problem, cannot exec `cc1plus': No such file or directory
[exec] make: *** [que_lib/lib/ss_semaphore_lib/ss_semaphore.o] Error 1source codepermission problem, executable files inside.
- Analyze MPARM simulation log files to know about the whole process.(Week 5, ES2017)
MPA Model
DSE-EXPO
Dead Lock
Assignment: Dead lock generation in Java/?(Week 1, ES2017)
K(ahn)P(rocess)N(etwork)
References
- DOL Manual
- SHAPES Reading Note
The design of future systems on chips requires a scalable hardware-software design approach. In the SHAPES (scalable software hardware architecture platform for embedded systems) project, a new hardware-software architecture paradigm is investigated.
一套新的硬件-软件架构的范例
Distributed Operation Layer: The distributed operation layer (DOL) is a software development framework to program parallel applications.
a. The DOL allows to specify applications based on the Kahn process network model of computation
b. Features a simulation engine based on SystemC.
c. Moreover, the DOL provides an XML-based specification format to describe the implementation of a parallel application on a multi-processor systems, including binding and mapping.
Moses: Moses (modeling, simulation, and evaluation of systems) is a graphical front-end to the DOL
allows to “draw” rather than write parts of an application specification.
Modular Performance Analysis: For real-time analysis of multi-processor systems, DOL specifcations can be converted into models for modular performance analysis (MPA).
DOL specifcations ——> MPA models
Within the SHAPES project, our environment is used to develop streaming applications from such diverse areas as medical imaging, audio wave field synthesis, and physical modeling of complex systems.
流应用 不同领域:医学影像,音频波场的合成,复杂系统的物理建模
http://www.tik.ee.ethz.ch/~shapes/dol.html
The distributed operation layer (DOL) is a framework that enables the (semi-) automatic mapping of applications onto the multiprocessor SHAPES architecture platform. The DOL consists of basically three parts:
applications ——> architecture platform code(binaries…)
a. DOL Application Programming Interface:
The DOL defines a set of computation and communication routines that enable the programming of distributed, parallel applications for the SHAPES platform.
Using these routines, application programmers can write programs without having detailed knowledge about the underlying architecture.
In fact, these routines are subject to further refinement in the hardware dependent software (HdS) layer.
HdS 硬件相关软件层
routines(例程,规范) —refine—> HdS layer
b. DOL Functional Simulation:
To provide programmers a possibility to test their applications, a functional simulation framework has been developed.
Besides functional verification of applications, this framework is used to obtain performance parameters at the application level.
functional simulation framework, obtain performance parameters
c. DOL Mapping Optimization:
The goal of the DOL mapping optimization is to compute a set of optimal mappings of an application onto the SHAPES architecture platform.
In a first step, XML based specification formats have been defined that allow to describe the application and the architecture at an abstract level.
Still, all the information necessary to obtain accurate performance estimates is contained.
obtain accurate performance estimates.
http://www.tik.ee.ethz.ch/~shapes/mpa.html
The approach we pursue is illustrated below.
First, the DOL specification is transformed into a framework-independent description of the analysis model (in XML).
Second, the analysis model is converted into a script for the RTC toolbox.
Additionally, a graphical frontend for the analysis model format has been implemented in Moses.
http://www.tik.ee.ethz.ch/~shapes/moses.html
a graphical frontend for DOL. The tool basically allows to “draw” process networks and mappings, and then automatically generate the corresponding DOL XML files.
Based on these graphical representations, Moses can generate the corresponding DOL XML files. - Huang K, Haid W, Bacivarov I, et al. Embedding formal performance analysis into the design cycle of MPSoCs for real-time streaming applications[J]. ACM Transactions on Embedded Computing Systems (TECS), 2012, 11(1): 8.